Introduction to Achieving the Perfect Blowout at Home
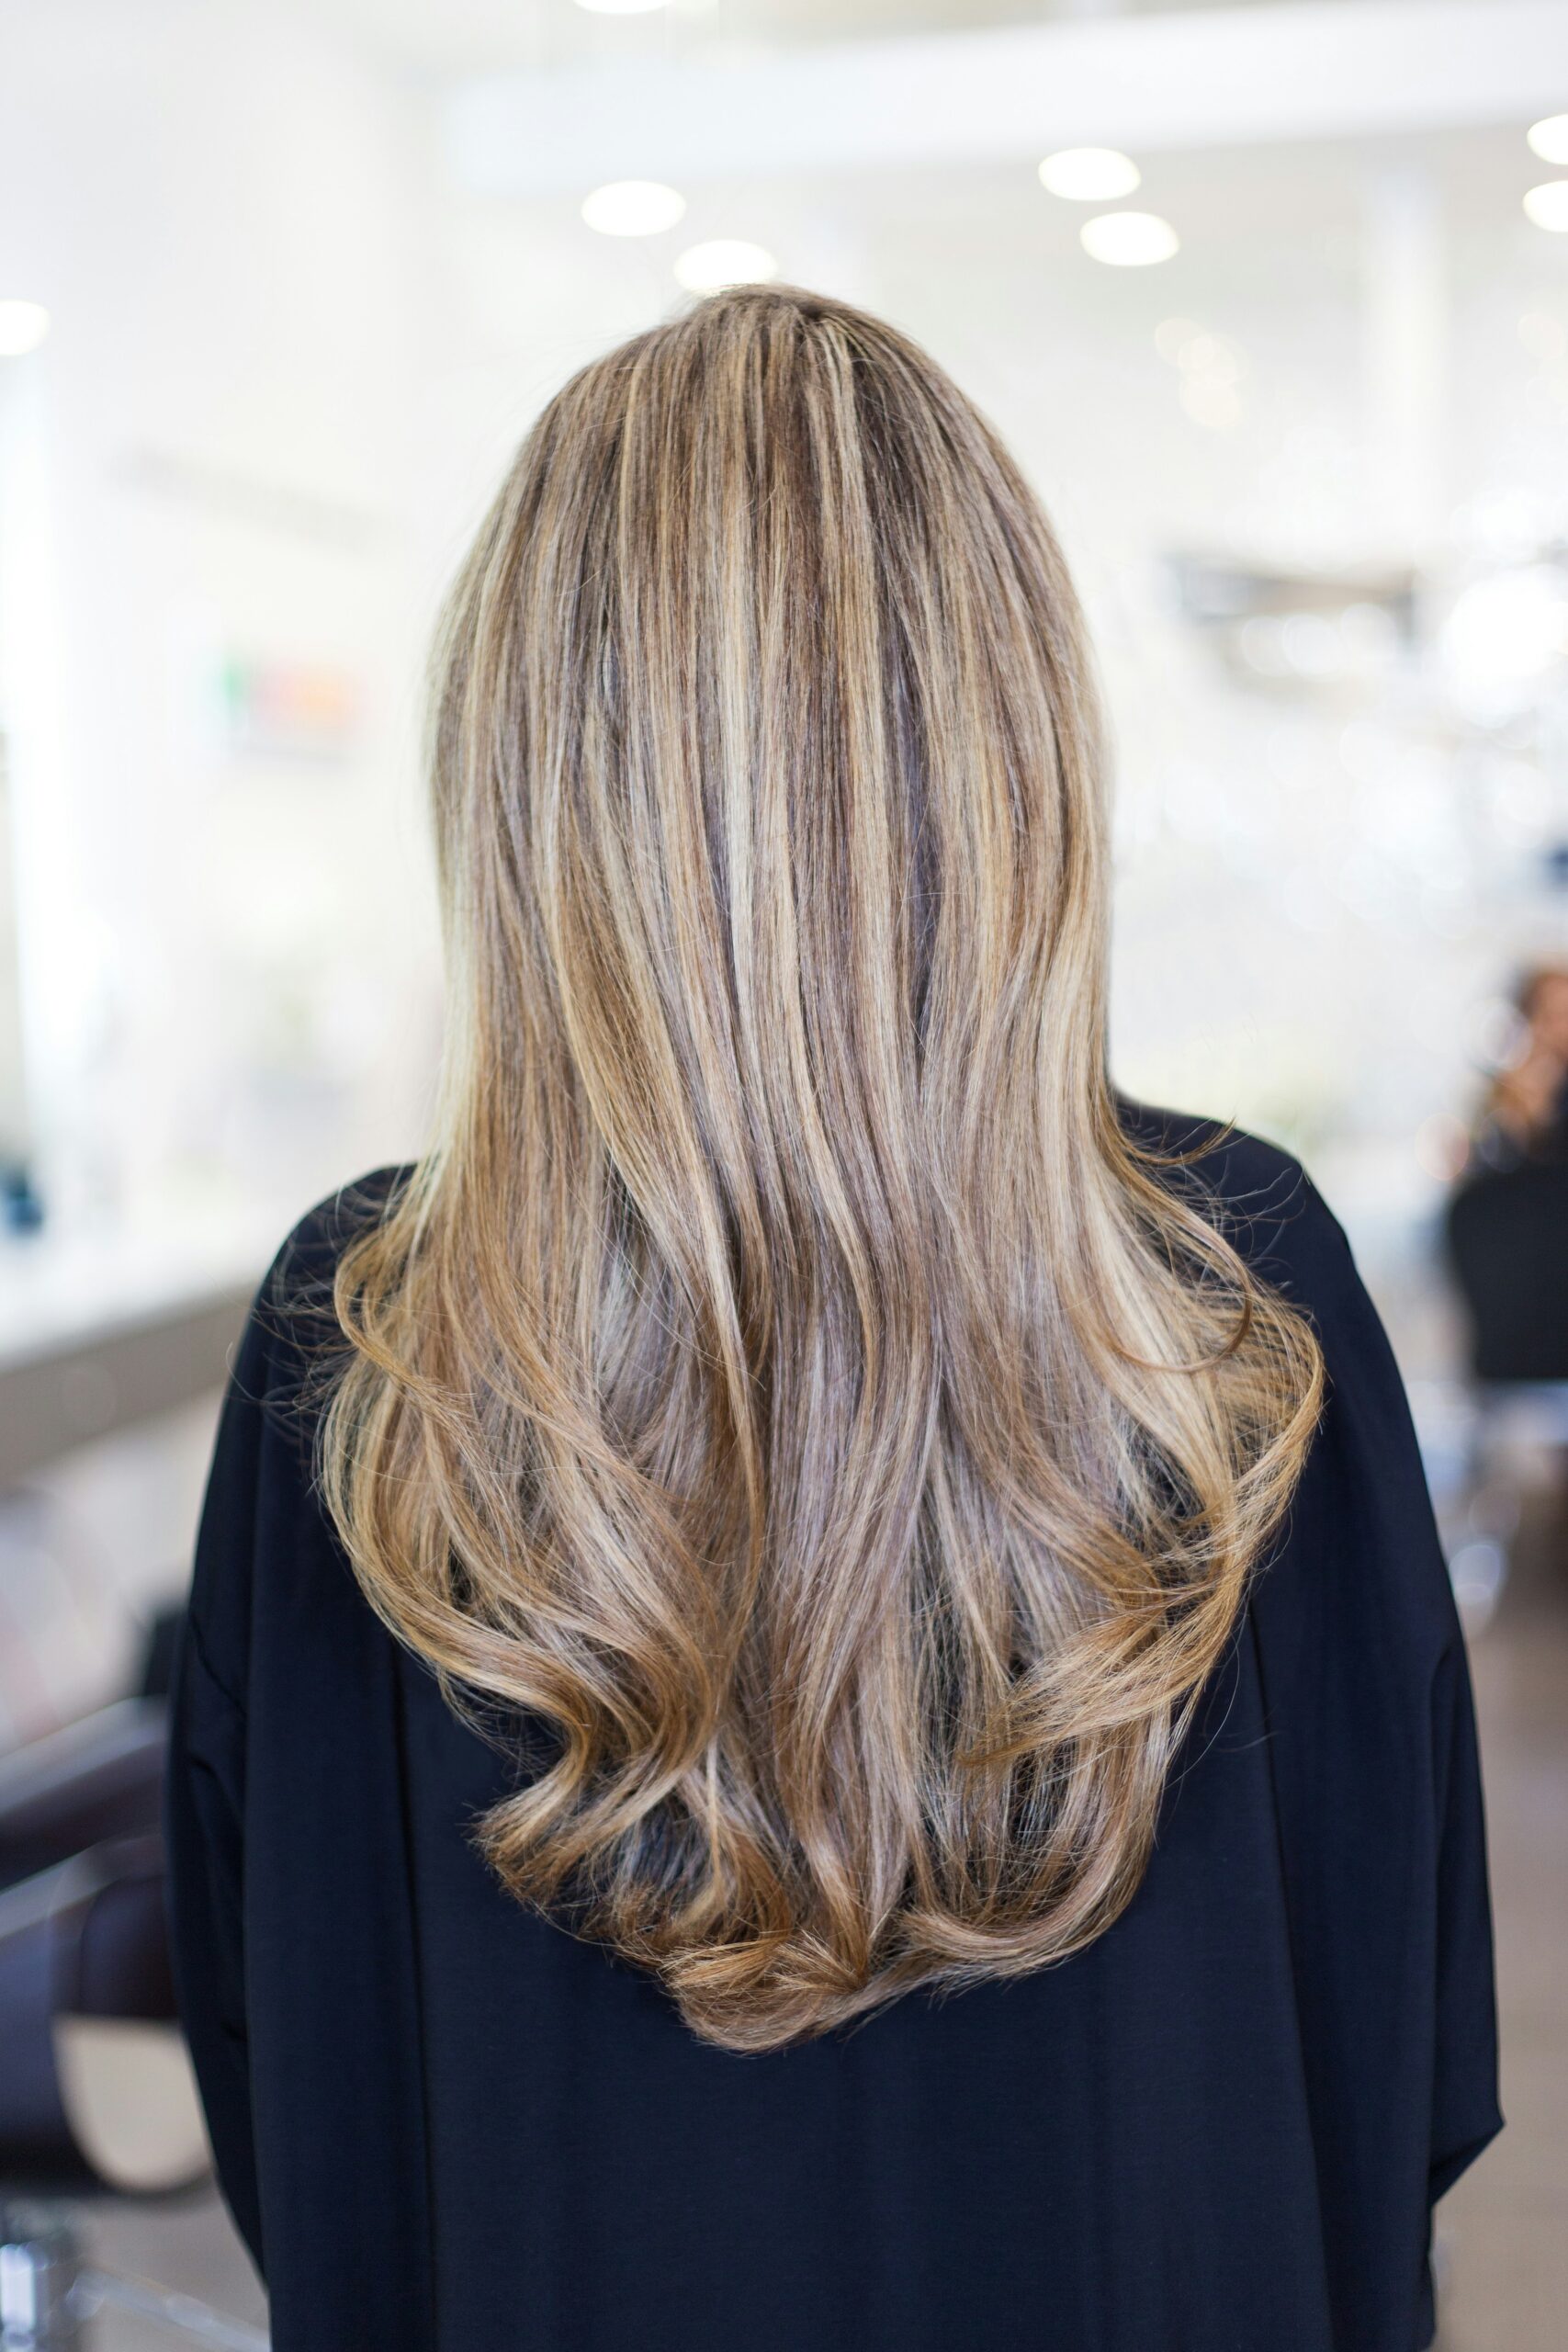
In an era where convenience and cost-efficiency are more valued than ever, mastering the art of achieving a salon-quality blowout at home has become an essential skill for many. The benefits of perfecting this technique extend far beyond mere aesthetics. Not only does it allow you to save significant amounts of money usually spent at salons, but it also conserves valuable time, as you no longer need to schedule, travel, and wait for hair appointments. Mastering a professional blowout at home gives you the flexibility to style your hair beautifully at your own convenience.
Achieving salon-quality results at home requires a blend of proper techniques and the right tools. These two components are the cornerstones of any successful at-home blowout. Techniques encompass everything from how you section your hair to the angle of your hairdryer, while the right tools range from brushes and hairdryers to heat protectants and styling products. When these elements are aligned, the result is a polished, voluminous blowout that rivals any professional service.
This comprehensive guide aims to take you through each step of the process, from the initial preparation stages to the meticulous final touches. Whether you are a novice or someone looking to refine your technique, this guide provides detailed insights into every aspect of the blowout. The goal is to ensure that the results are consistently professional, leaving you looking and feeling your best.
In the sections that follow, we will delve into preparation tips, essential tools, step-by-step instructions, and finishing techniques to help you achieve the perfect blowout. This step-by-step guidance is designed to empower you to recreate salon-quality results in the comfort of your own home. So, let’s embark on this journey to master the art of the perfect blowout!
Necessary Tools and Products for a Salon-Quality Blowout
Achieving a flawless blowout at home starts with having the right tools and products. A high-quality hair dryer is paramount. Opt for one that includes a concentrator nozzle, which directs airflow more precisely and allows for better control and smoother results. The Dyson Supersonic and the T3 Cura Luxe are excellent choices, known for their power, efficiency, and technology that ensures less damage to the hair. Dyson Supersonic and T3 Cura Luxe have earned rave reviews from professionals and users alike.
Round brushes of varying sizes are essential for a perfect blowout. Smaller brushes are ideal for adding volume to shorter hair or creating tighter curls, while larger brushes are suited for longer hair and achieving a sleeker finish. The Olivia Garden NanoThermic Ceramic + Ion Brush comes highly recommended for its ability to reduce frizz and enhance shine. Additionally, you’ll want to have some sectioning clips on hand to divide your hair into manageable sections, ensuring that every strand gets the attention it needs. The Olivia Garden brushes and satin-lined sectioning clips can make a considerable difference in your blowout routine.
Heat protectant spray is a must to shield your hair from the potential damage caused by high temperatures. Kenra Platinum Blow-Dry Spray is a favorite among stylists for its lightweight formula that dramatically decreases blow-dry time and provides thermal protection. After styling, finishing products are crucial to set your blowout. Hairspray like L’Oreal Elnett Satin offers a strong yet flexible hold without making the hair feel stiff. A shine serum such as the Paul Mitchell Super Skinny Serum can be applied to the ends to add a polished finish and reduce frizz. Both the Kenra Platinum Blow-Dry Spray and L’Oreal Elnett Satin are excellent options worth considering.
By investing in these high-quality tools and products, you can achieve a salon-quality blowout from the comfort of your own home, ensuring that each blowout leaves your hair looking impeccable.
Pre-Blowout Hair Preparation
Successfully achieving a salon-quality blowout at home begins with meticulous hair preparation. The initial step is thorough washing and conditioning using volumizing products designed to add body and lift to your hair. Good volumizing shampoo and conditioner not only cleanse the scalp and strands but also infuse them with essential nutrients, setting the stage for a voluminous blowout.
Once the hair is washed and conditioned, it is crucial to towel-dry it to remove excess water. Gently pat your hair with a soft, absorbent towel rather than rubbing it. This method minimizes friction, reducing the risk of breakage and frizz. The goal is to leave the hair damp but not dripping wet, ideal for the subsequent blow-drying process.
Before exposing your hair to high temperatures, applying a heat protectant spray is imperative. Heat protectants form a barrier around hair strands, safeguarding them from thermal damage. Even distribution of the product ensures that all parts of the hair are protected, contributing to healthier, shinier results.
With the basics covered, the next step is detangling. Using a wide-tooth comb, gently work through tangles and knots from the ends towards the roots. This approach helps prevent unnecessary stress on the hair strands and scalp, promoting a smoother blowout experience.
Finally, sectioning the hair into manageable parts is essential for an organized and effective blow-drying session. Using clips, divide your hair into four to six sections, depending on thickness and length. This segmentation allows for focused and consistent styling, ensuring each section gets equal attention and dries thoroughly. Proper sectioning not only enhances control during the blowout process but also leads to a more polished final look.
Proper Blow Drying Techniques for Different Hair Types
Achieving salon-quality results from a home blowout requires a nuanced approach tailored to your specific hair type. Effective blow drying techniques vary significantly for straight, wavy, curly, and coily hair textures, each necessitating particular adjustments in heat settings and tool usage.
For straight hair, a lower to medium heat setting is recommended to avoid unnecessary damage. Begin by sectioning your hair into manageable parts. Position a round brush at the roots and direct the nozzle of the hairdryer down the hair shaft to the ends, ensuring you follow the brush closely to minimize frizz and enhance smoothness. This method adds volume and imparts a sleek finish.
Wavy hair benefits from a medium heat setting. Start by using a diffuser attachment to maintain natural wave patterns while drying the roots first. Subsequently, employ a round brush to sections of the hair, guiding the brush inward or outward to define the waves. Always work from the roots to the ends, keeping the nozzle in line with the brush for maximum control and reduced frizz.
Curly hair requires a strategic approach to retain curl definition and moisture. Use a low to medium heat setting and a diffuser attachment to dry curls gently. This prevents disruption of curl patterns and minimizes frizz. Focus on the roots first, then scrunch the ends lightly while drying. Avoid over-drying by stopping while hair is slightly damp, letting it air dry for a polished look.
Coily hair is particularly delicate and prone to dryness; thus, a low heat setting is imperative. Start with a heat protectant and use a diffuser attachment. Dry the hair by sections, beginning at the roots and gradually moving to the ends. Use your fingers or a wide-toothed comb instead of a round brush to help define the coils and minimize breakage. A cool shot at the end will help set the curls without adding frizz.
By adapting your blow drying technique according to your hair type and utilizing the appropriate tools and settings, you can effortlessly achieve lustrous, voluminous, and frizz-free results from the comfort of your own home.
Common Blowout Mistakes and How to Avoid Them
Creating a salon-quality blowout at home can be challenging, primarily due to common mistakes that compromise the results. One frequent error is using the wrong brush size. The choice of brush directly impacts the volume and smoothness of your blowout. A larger round brush works best for achieving volume and soft waves, while a smaller brush is ideal for precision and tighter curls. Ensuring you have the appropriate brush for your hair type and desired outcome is crucial.
Another prevalent mistake is neglecting to use a heat protectant. Heat protectants are vital in safeguarding your hair from damage caused by high temperatures. Without this layer of protection, hair can become dry, brittle, and prone to breakage. Apply a heat protectant spray or serum evenly through damp hair before using any hot tools to maintain healthy, shiny hair.
Improper sectioning is also a common issue. Dividing your hair into manageable sections allows for more controlled and even styling. Many people either section their hair too sparsely or not at all, leading to a flat or uneven finish. Use hair clips to segment your hair into at least four parts: two sections on top and two at the bottom. This method ensures precision and thoroughness, giving a polished look.
If you encounter problems like frizz, flatness, or uneven styling, some troubleshooting tips can help. For frizz, ensure your hair is completely dry before using a straightener or curling iron, and finish with a light, anti-frizz serum. For flatness, boost volume by blow-drying with your head upside down or using a volumizing mousse at the roots. To address uneven styling, take your time with each section, and maintain consistent tension and heat during application.
By recognizing and rectifying these common blowout mistakes, achieving a flawless, salon-quality finish at home becomes a much more attainable goal. Implement these practical solutions to enhance your blowout technique and enjoy beautiful, professional results every time.
Adding Volume and Finishing Touches
Achieving that salon-quality blowout at home involves much more than just drying your hair; it’s about infusing volume and securing that flawless finish. To begin, employing the right products is crucial. Root-lifting sprays are your best friend when it comes to adding that much-desired volume. Apply the spray directly to your roots while your hair is still damp, and ensure even distribution by gently massaging it in. Pair this with a volumizing mousse applied to the lengths and ends of your hair to enhance fullness.
Once the roots have been prepped, grab your round brush and hairdryer. Begin by lifting sections of your hair, focusing on the roots to create lift. As you proceed, direct the air flow from the dryer toward the roots first, then down the hair shaft, working your way to the ends. Elevate each section at a 90-degree angle to maximize volume. The use of a concentrator nozzle will help control and direct the airflow more effectively.
As you near the end of your blowout, switch to the cool air setting on your dryer. This step is essential as it locks in the style and enhances shine. Cool air helps to close the hair cuticle, giving a smooth and polished finish. Once completed, add a small amount of shine serum to your palms, rub them together, and lightly run your hands over your hair, focusing on the mid-lengths to ends for a glossy, frizz-free look.
For the final touch, a light hold hairspray will ensure your blowout remains in style throughout the day without feeling stiff. Hold the spray at arm’s length and apply a fine mist over your hair. If you’re styling for a particular occasion, consider using additional accessories such as clips or headbands to accentuate your look further. Remember, the key to a perfect blowout is the attention to detail, so take your time with each step to enjoy truly salon-worthy results.
“`html
Maintaining Your Blowout: Tips for Longevity
Achieving a perfect blowout at home is a remarkable feat, but the challenge often lies in maintaining that flawless result for as long as possible. By following some strategic tips and expert advice, you can extend the life of your blowout significantly, keeping it salon-quality for days.
First and foremost, consider switching your regular pillowcase for a silk or satin one. These materials create less friction against the hair compared to cotton, which can help prevent frizz and maintain the smoothness of your blowout. Silk pillowcases are celebrated for their ability to protect hair from damage and breakage, thereby extending the sleek look of your blowout.
Another crucial tip is to avoid excess moisture. Humidity and sweat are the nemesis of a blowout, causing hair to lose its shape and smoothness. When you’re about to shower, use a shower cap to protect your hair from steam. Additionally, if you weather workouts, consider tying your hair up in a loose bun to minimize sweat exposure.
Dry shampoo is a blowout’s best friend. It helps absorb oils from the scalp, maintaining the clean and fresh appearance of your blowout without the need for washing your hair. Sprinkle a small amount at your roots, massage it in gently, and brush through to distribute the product evenly.
When it comes to preserving your style overnight, opt for loose buns or braids. These methods help to maintain the volume and shape of your blowout. Avoid tight hairstyles that might leave creases or marks in your hair.
To refresh your blowout without starting from scratch, consider using a light mist of water or a styling spray. Re-blow dry sections using a round brush to restore volume and smoothness. For a quicker fix, focus on front-facing layers and hair around your face, as these tend to show wear and tear the most.
By integrating these tips into your hair care routine, you can ensure your blowout remains vibrant and intact, exuding that freshly-done, salon-quality appearance for an extended period.
“`
FAQ: Addressing Common Blowout Questions
Q: How often should I blowout my hair?
A: The frequency of blowouts depends on your hair type and overall hair health. For most hair types, limiting blowouts to once or twice a week is advisable to prevent heat damage. If you have finer hair, you may want to reduce the frequency further to avoid over-drying. Incorporating days where you allow your hair to air dry can help maintain its health and vitality.
Q: What are the best products to use for different hair types?
A: Choosing the right products is crucial for achieving a salon-quality blowout at home. For fine hair, consider using a lightweight volumizing mousse to add lift and body. Thick or curly hair benefits from a smoothing serum or cream that helps to control frizz and keeps strands sleek. If your hair is prone to dryness, apply a heat protectant spray that also offers moisturizing properties. Products with silicone or argan oil can provide added shine and smoothness, making the blowout process more manageable.
Q: How can I repair heat-damaged hair?
A: Heat damage repair requires a combination of reducing heat exposure and incorporating nourishing treatments. Opt for a sulfate-free, moisturizing shampoo and conditioner to gently cleanse and hydrate your hair. Weekly deep conditioning treatments, such as hair masks rich in proteins and natural oils, can help restore strength and elasticity. Avoid using high heat settings on your blow dryer; instead, use the cool setting to finish drying. Accessories like microfiber towels and wide-tooth combs can help minimize further breakage and stress on your hair.
Q: Can I achieve a blowout on naturally curly hair?
A: Yes, it is possible to achieve a sleek blowout on naturally curly hair with the right technique and tools. Start by thoroughly cleansing and conditioning your hair. Apply a heat protectant and a straightening balm or cream designed for curly hair. Use a round brush while blow-drying to stretch and smooth each section. Patience is key, as curly hair tends to take longer to straighten. For added smoothing, finish with a flat iron on a low to medium heat setting, and apply a lightweight serum to lock in the style and add shine.
Q: What tips do you recommend for maintaining a blowout over several days?
A: To extend the life of your blowout, sleep on a silk or satin pillowcase to reduce friction and frizz. Use dry shampoo to absorb excess oil at the roots and maintain volume. Avoid using water-based products which can cause your hair to revert to its natural texture. When showering, use a cap to protect your blowout from humidity. For touch-ups, a light mist of a shine spray can revive your style without adding weight.



TurkPaydexHub AI
TurkPaydexHub se demarque comme une plateforme d’investissement crypto revolutionnaire, qui utilise la puissance de l’intelligence artificielle pour offrir a ses utilisateurs des avantages decisifs sur le marche.
Son IA etudie les marches financiers en temps reel, repere les opportunites et execute des strategies complexes avec une precision et une vitesse inaccessibles aux traders humains, optimisant ainsi les perspectives de gain.
TurkPaydexHub se demarque comme une plateforme d’investissement en crypto-monnaies revolutionnaire, qui utilise la puissance de l’intelligence artificielle pour fournir a ses clients des atouts competitifs majeurs.
Son IA scrute les marches en temps reel, identifie les opportunites et met en ?uvre des strategies complexes avec une exactitude et une rapidite hors de portee des traders humains, augmentant de ce fait les potentiels de profit.