
Introduction to DIY Manicures
The trend of DIY manicures has gained significant traction in recent years, reflecting a shift in how individuals approach personal grooming. With increasing emphasis on self-care and home-based beauty rituals, many are discovering the joys and benefits of developing their own nail care routine. A DIY manicure not only offers the luxury of professional-quality results but also provides an opportunity for self-expression through creativity and color.
One of the most appealing aspects of DIY manicures is their convenience. The global pandemic has led to many people reassessing their habits and routines, prompting them to seek alternatives to traditional salon visits. The ability to perform a manicure at home eliminates the need for scheduling appointments and traveling to a salon, allowing individuals to create their desired look on their own time. This newfound freedom has made DIY manicures an attractive option for busy lifestyles and those who value flexibility.
Additionally, DIY manicures offer cost-effectiveness that cannot be overlooked. Regular salon visits can lead to significant expenses, especially for those who frequently indulge in nail art or other specialized services. By investing in essential tools and quality products for home manicures, individuals can achieve similar results while saving money in the long run. Moreover, learning to perform manicures at home can be a rewarding experience that fosters a sense of accomplishment.
As a result of these factors, the popularity of DIY manicures continues to rise. What was once a niche habit is now embraced by a diverse audience eager to explore the possibilities of at-home nail care. With the right techniques and tools, anyone can achieve salon-quality results within the comfort of their own home, making DIY manicures a worthwhile endeavor for countless individuals seeking both beauty and practicality.
Gathering Essential Tools and Products
To achieve salon-quality results during a DIY manicure, it is crucial to gather the necessary tools and products beforehand. Having the right items at your disposal can streamline the process and enhance the overall outcome of your manicure. The essential tools for a successful manicure include nail clippers, files, buffers, and cuticle pushers.
First and foremost, nail clippers are indispensable for shaping and trimming your nails. A quality pair of clippers is necessary to ensure clean edges and avoid any snags. Following the clipping process, a nail file is essential for refining the shape of your nails. Choose a nail file with a suitable grit that matches your nail type, as a finer grit is better for natural nails, while coarser files can be used for artificial nails.
A buffer is another critical tool that helps to smooth the surface of the nails and add a natural shine, eliminating the need for additional products. Selecting a buffer with multiple sides for various levels of coarseness can further enhance the finishing touches of your manicure.
Cuticle pushers are vital for tidying the area around your nails. These tools help in gently pushing back the cuticles, creating a clean look while promoting healthy nail growth. Investing in a high-quality cuticle pusher, whether metal or wooden, will ensure a safe and effective grooming experience.
Lastly, no DIY manicure is complete without a selection of nail polishes. Opt for a variety of colors and finishes, including base coats, top coats, and quick-dry formulas, to elevate your DIY experience. A well-rounded collection allows for creativity and personalization, providing an array of options for every occasion. By gathering these essential tools and products, you will set the stage for a successful DIY manicure that rivals those done in professional salons.
Preparing Your Nails
To achieve salon-quality results with your DIY manicure, it is essential to begin with a thorough preparation of your nails. This initial step lays the foundation for a flawless finish, enhancing both the appearance and longevity of your manicure. The first action in preparing your nails is cleaning. Start by removing any existing nail polish with an acetone-free remover to avoid drying out your nails. Once polish-free, wash your hands with soap and water to remove any residues and debris. Dry your hands thoroughly to ensure no moisture interferes with the application of your manicure products.
Next, shaping your nails is crucial for both aesthetics and nail health. Use a high-quality nail file to shape your nails according to your preference, whether you prefer an oval, square, or almond shape. It is advisable to file in one direction to prevent splitting or damaging your nails. If there are any rough edges after filing, gently buff them with a buffer to create a smooth finish. Remember, keeping your nails at a manageable length not only enhances their appearance but also helps them withstand daily activities.
Lastly, cuticle care is vital when preparing your nails. Apply a cuticle cream or oil to soften the cuticles and allow them to be pushed back gently with a cuticle pusher. This process not only removes excess skin but also encourages healthy growth without the risk of hangnails. Be cautious not to cut your cuticles, as this can lead to infections. By following these steps—cleaning, shaping, and caring for your cuticles—you set the stage for a beautiful and long-lasting DIY manicure. A well-prepared base is key to achieving professional-looking results at home.
Soaking and Softening Cuticles
Soaking your nails is an essential step when preparing for a DIY manicure, particularly for softening cuticles and ensuring a flawless finish. By following a few simple steps, you can create an optimal environment for your nails and cuticles, making the subsequent grooming process more effective.
Begin by filling a bowl with warm water, ensuring that the temperature is comfortable for your skin. The warmth of the water helps to open up the pores in your cuticles, enabling easier manipulation and removal. You may enhance this soaking solution by adding a few drops of essential oils or a moisturizing cream. Popular options include almond oil, olive oil, or specialized cuticle oils, each of which provides distinct nourishment while softening the cuticles. These oils not only hydrate but also improve the overall health of your nails, preventing brittleness and breakage.
The soaking process should last between 5 to 10 minutes. During this time, you can gently massage the cuticles and nail beds to promote blood circulation. This practice not only aids in softening the cuticles but also contributes to healthier nail growth. After soaking, employ a cuticle pusher or an orange stick to carefully push back the softened cuticles. This action should be performed gently to avoid any injury or damage to the delicate skin around the nails. It’s essential to keep the tools sanitized to prevent any bacterial infection.
Following the soaking and softening process, consider applying a rejuvenating cuticle cream or oil. This will lock in moisture, ensuring that your nails stay hydrated. This step is crucial in maintaining the health of your nails and promoting a polished, salon-quality manicure. Overall, the soaking and softening of cuticles is foundational for successful nail care, facilitating an aesthetically pleasing finish and enhanced nail vitality.
Cuticle Care: Push and Trim
Maintaining healthy cuticles is an essential aspect of achieving salon-quality results in DIY manicures. Neglecting cuticle care can lead to unsightly skin, which detracts from the overall appearance of the nails. Proper cuticle management involves two primary techniques: pushing back and trimming. These techniques, when executed carefully, promote both the health of the nails and the surrounding skin.
Starting with the cuticle pushback, it is crucial to use a gentle approach to avoid damaging the delicate skin. Before you begin, ensure your cuticles are softened, which can be achieved by soaking your fingers in warm, soapy water or applying a dedicated cuticle remover. Utilizing a soft cuticle pusher, preferably made of rubber or plastic, gently push back the cuticles in a sweeping motion, being descriptive but not forceful. This process not only enhances the appearance of the nails but also facilitates the growth of healthy cuticles, allowing for optimal nail extension.
Trimming should be approached with caution. It is advisable to only trim loose, dead skin to prevent any potential injuries or infections. Cuticle nippers or scissors should be sanitized before use to ensure a sterile environment. Carefully remove any excess cuticle skin without over-trimming, which can lead to painful hangnails and other complications. An important factor in cuticle care is to resist the urge to cut excessively; this could damage the nail bed and hinder proper nail development.
Incorporating these techniques into your manicure routine will not only enhance the appearance of your nails but also promote healthier cuticles. Consistent care will improve nail longevity and overall aesthetics, contributing to an at-home manicure that rivals professional results.
Nail Shaping Techniques
Nail shaping is a crucial aspect of achieving salon-quality results during a DIY manicure. The shape of your nails can dramatically influence the overall aesthetic and elegance of your hands. Common nail shapes include square, oval, and almond, each offering a unique style that can complement various hand shapes and personal preferences. To begin, gather the necessary tools, including a high-quality nail file, buffer, and clippers, to achieve the desired outcome effectively.
Starting with the square shape, which is characterized by straight edges and a flat tip, it is essential to use a straight file. Hold the file at a right angle to the nail edge, and file in one direction towards the center. Repeating this process on both sides will help maintain symmetry. The square shape is ideal for individuals seeking a bold, modern appearance.
For an oval shape, which offers a softer and more feminine profile, use a rounded nail file. Instead of a straight edge, gently follow the natural curve of the nail bed. File from the outer edges towards the center, ensuring you maintain a consistent arc. The oval shape can elongate fingers and is flattering on most hand shapes.
The almond shape combines the features of both square and oval shapes, presenting a tapered end that resembles the shape of an almond. To achieve this effect, start by creating a square base, followed by filing the sides to a point. Focus on maintaining a balanced taper. This shape is particularly elegant and is often favored for special occasions.
Regardless of the style you choose, it is essential to file your nails gently to prevent damage and splitting. Regularly checking for evenness and balance as you file will ensure that the final result is polished and professional. A well-shaped nail not only enhances beauty but also lays a perfect foundation for polish application, ensuring longevity and shine.
Buffing Your Nails for Shine
Buffing your nails is an essential step in achieving a polished and salon-quality manicure at home. This technique not only enhances the appearance of your natural nails but also helps in promoting healthier nails with regular practice. The primary aim of buffing is to smooth the surface of the nails and enhance their natural shine, providing a more glossy and vibrant look without the need for additional nail polish.
To begin the buffing process, it is crucial to select the right buffer. Generally, nail buffers come in different grits, which determine their abrasiveness. It is advisable to start with a buffer that has a finer grit to prevent any excessive damage to your nails. The use of a four-way buffer allows for a thorough and stepwise approach: filing, smoothing, shining, and polishing. Each side of the buffer serves a specific purpose, ensuring a well-rounded buffing experience.
To effectively buff your nails, first, ensure they are clean and free of any nail polish, as residue can interfere with the process. Gently file the edges of your nails to achieve your desired shape. Then, proceed to use the smoothing side of the buffer, gently moving it back and forth across the nail surface. This step helps to remove any unevenness and prepares the nail for the shining phase. Importantly, avoid excessive pressure and buffing for extended periods, as this can weaken the nail structure and lead to damage.
Following the smoothing step, transition to the shining side of the buffer. Use light, sweeping motions to avoid friction that may compromise nail health. Buffing your nails not only adds luster but also stimulates blood circulation, contributing to their strength. Incorporating this technique into your manicure routine will undoubtedly enhance nail appearance while promoting overall nail health.
Base Coat: The Foundation of Your Manicure
A base coat serves as the essential foundation for achieving a professional-looking manicure at home. Its primary function is to create a protective barrier between your natural nails and the nail polish. This barrier not only helps to prevent staining of the nails from pigmented polishes but also aids in minimizing damage that can occur from exposure to harsh chemicals found in certain products. Applying a base coat is a crucial step in the manicure process, and neglecting this can lead to unsightly yellowing or discoloration over time.
Furthermore, a base coat improves the adhesion of the nail polish, allowing it to stick better to the nail surface. This improved adherence is key for extending the longevity of your manicure; it reduces the chances of chipping and peeling that can occur when color is applied directly to the nail. Many base coats contain special formulations that promote better bonding with colored polishes, ensuring that the manicure looks fresh and polished for an extended period.
In addition to its protective benefits, many modern base coats are enriched with nourishing ingredients that promote nail health. Ingredients such as vitamins, oils, and strengthening agents not only help to fortify the nails but also create a smoother canvas for color application. A smooth surface is vital, as inconsistencies on the nail can lead to an uneven polish application, making the manicure appear less professional.
In summary, incorporating a base coat in your DIY manicure routine is a simple yet vital step that helps protect your nails, enhances polish adhesion, and improves the overall appearance of your manicure. By taking this extra step, you contribute to the durability and aesthetic quality of your nails, achieving salon-quality results from the comfort of your home.
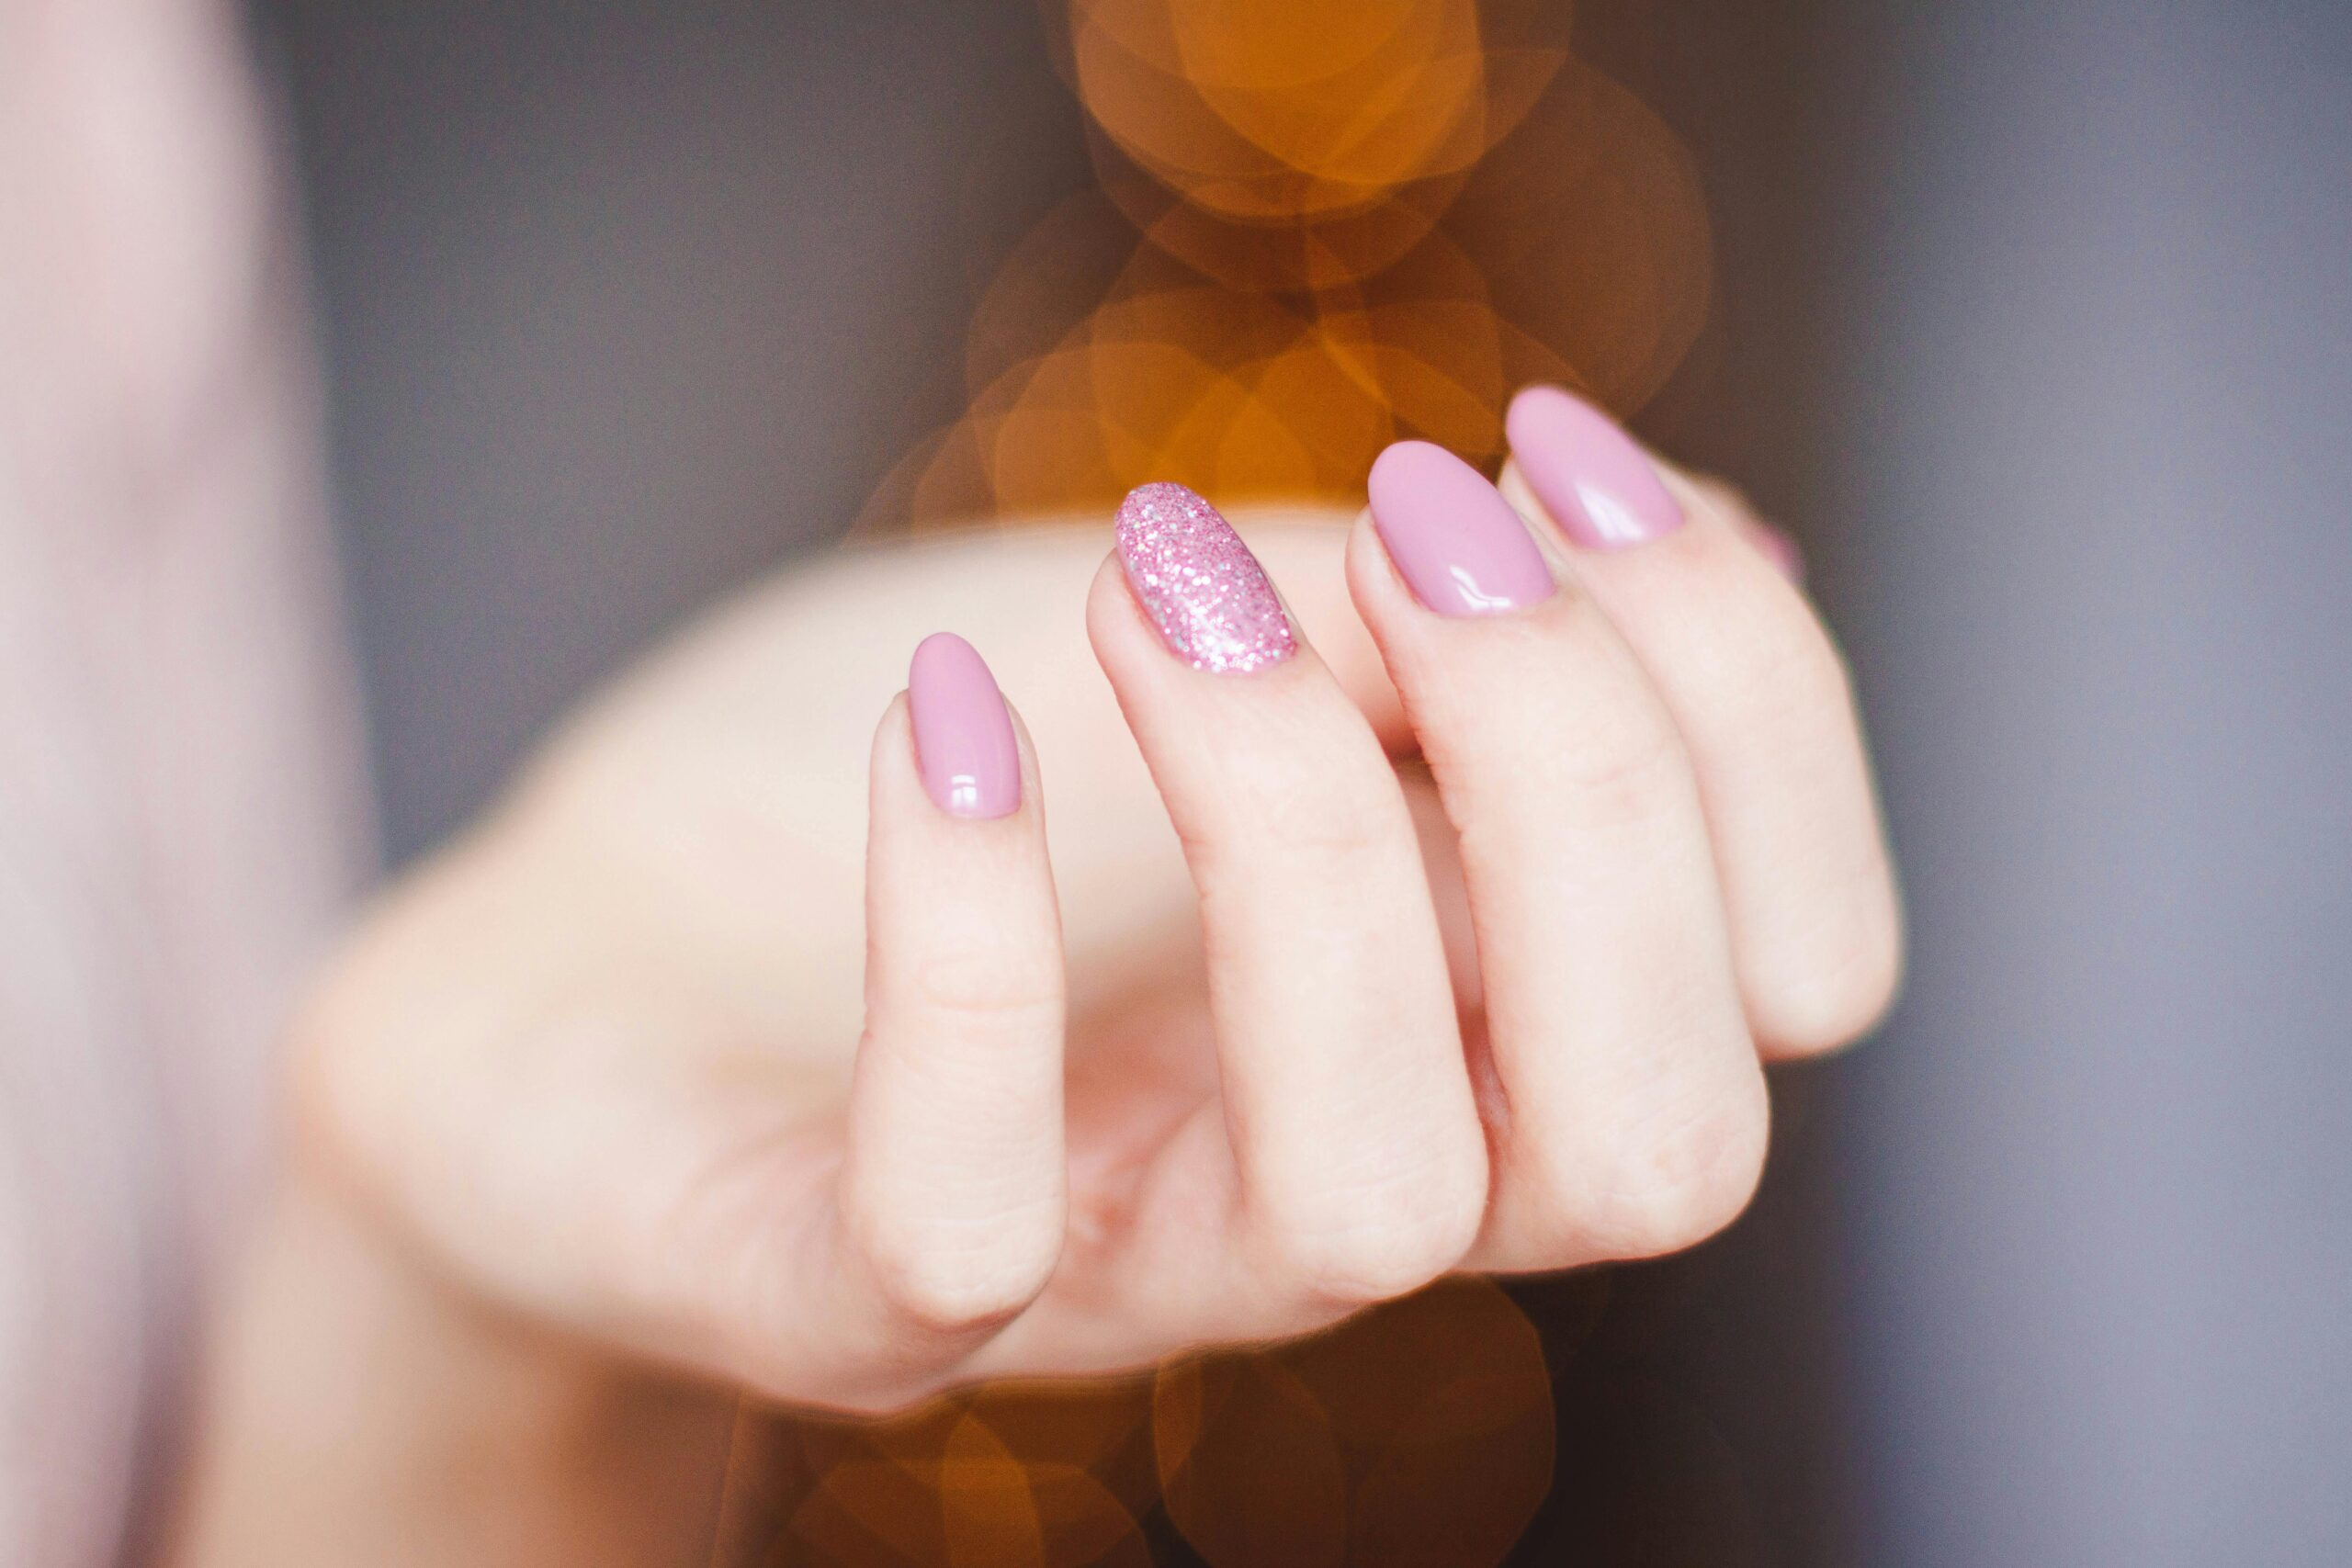
Choosing the Right Nail Polish Color
Selecting the appropriate nail polish shade can significantly elevate your DIY manicure experience. The right color not only complements your outfit but also reflects your personality and the occasion. When making a choice, consider the event you are attending. For formal occasions, classic colors such as deep red, nude, or shades of pink often convey elegance and sophistication. Meanwhile, vibrant hues like electric blue or neon green can add a touch of fun and spontaneity, perfect for casual gatherings or summer parties.
Seasonality is another vital factor when choosing nail polish. As the seasons change, so do the shades that resonate best. Spring typically calls for soft pastels like mint green or lavender, which symbolize renewal and warmth. In contrast, autumn invites deeper tones such as burgundy, mustard, or burnt orange, reflecting the rich colors of falling leaves. Winter can be a time for sparkling metallics or dark hues, such as charcoal or navy, conveying a sense of coziness and festivity. Embracing seasonal colors can enhance your overall aesthetic and keep your look fresh and relevant.
Your personal style should also guide your nail polish selection. If your wardrobe leans toward minimalist designs, consider classic shades that maintain a polished look, such as taupe or pale pink. Conversely, if you have a bold and eclectic style, don’t hesitate to explore unconventional colors and intricate patterns, such as ombre techniques or glitter accents. Remember that nail art and color choices can be a form of self-expression; thus, feel free to experiment until you find shades that resonate with your unique identity.
Application Techniques for Nail Polish
Applying nail polish can seem straightforward, yet achieving a salon-quality finish requires attention to detail and specific techniques. Start by preparing your nails; ensure they are clean, dry, and free from any oils or lotions. A good practice is to wash your hands with soap and water, then use a nail polish remover to eliminate any residue. Once your nails are prepped, consider applying a base coat. This step is crucial as it protects your natural nails, helps to prevent staining, and allows the polish to adhere better.
When applying nail polish, always opt for thin layers rather than thick ones. Begin by loading the brush, then gently swipe the polish on from the cuticle to the tip of your nail, ensuring to slightly overlap the base of the nail without touching the skin. Using this method not only helps achieve even coverage but also prevents unsightly streaks and bubbles. It is advisable to start from the center of the nail, moving towards the edges to create a balanced application. Repeat this process on all nails, allowing each layer to dry thoroughly before proceeding to the next.
As you apply the color coat, it is essential to work in a well-lit area to detect any missed spots or uneven patches. If you encounter bubbles, they can often be avoided by ensuring that the polish is not shaken before use, as this introduces air. Instead, gently roll the bottle between your palms. Once you have achieved the desired opacity, finish off with a top coat; this adds shine and extends the longevity of your manicure. Allow your nails to dry completely for the best results, avoiding any abrupt movements that could cause smudging. Following these techniques will help you achieve a polished look that rivals professional salons.
Adding Designs: Nail Art Basics
Nail art has become an essential component of the DIY manicure experience, allowing individuals to express their creativity while providing a personal touch to their style. Engaging in basic nail art techniques can elevate your manicure from simple to stunning, and the right tools can make all the difference. For beginners, it’s crucial to start with a few simple designs that are both manageable and enjoyable.
One of the primary tools for nail art is the dotting tool. This versatile instrument allows you to create a wide range of designs, from polka dots to intricate floral patterns. To use a dotting tool, simply dip the end into polish and press it onto the nail to form the desired shape. Working with different sizes can enhance your designs, enabling you to play with scale and complexity.
Another effective technique is striping tape. This adhesive tape can help create clean lines and precise geometric patterns. To utilize striping tape, apply it to the nail after your base coat has dried. Once your nail art is complete, gently peel off the tape to reveal sharp edges. This method is especially popular for creating chic, modern designs that are often seen in salons.
Moreover, using a small detail brush will provide you with the ability to execute more intricate patterns, like delicate flowers or swirls. When working with this tool, patience is crucial; take your time to ensure the paint flows smoothly and the strokes are even. It is advisable to start with simple shapes such as hearts or stars before advancing to more complex designs.
Overall, nail art allows for a beautiful fusion of personal style and creativity. By using a few basic tools and techniques, anyone can achieve eye-catching designs right at home. Embrace your artistic side and experiment with various ideas to develop your nail art skills.
Drying and Setting Your Polish
Following the application of your nail polish, it’s crucial to ensure that your manicure dries effectively and remains intact for as long as possible. Proper drying and setting can significantly enhance the longevity of your polish, preventing unsightly smudges and dents. One of the most effective methods to expedite the drying process is to incorporate a quick-dry topcoat into your routine. These specialized topcoats not only reduce drying time but also add a layer of shine and protection that helps to seal in color.
In addition to using quick-dry products, there are several techniques that can be employed to improve drying efficiency. For instance, consider utilizing a fan or a hairdryer on a cool setting to promote airflow around your nails. This method can help to evaporate the solvents in nail polish faster, resulting in a quicker drying time. Furthermore, maintaining a consistent and moderate temperature in your workspace aids in effective drying; a cooler environment tends to dry polish more slowly than a warmer one.
Another beneficial practice is to avoid touching your nails while they are still drying. Even a gentle touch can disrupt the polish and lead to imperfections. Instead, allow your nails to air dry for several minutes after application. Once you believe the base layer is dry, applying the quick-dry topcoat is recommended, ensuring that you cover the tips of your nails as well. This step reinforces the polish, preventing chipping and extending your manicure’s life.
Finally, if you have the option, try to keep your hands away from water and extreme temperatures for a few hours post-manicure. Water can significantly weaken the polish’s adhesion to the nail and lead to quicker wear. By following these methods to speed up drying time and ensuring your manicure remains intact, you can achieve salon-quality results from the comfort of your home.
Top Coat: Ensuring Longevity
Applying a top coat is a crucial step in achieving salon-quality results when it comes to DIY manicures. This final layer offers multiple benefits, primarily ensuring the longevity of your nail color while simultaneously enhancing its shine. A top coat acts as a protective barrier that seals in the color you have applied, helping to prevent chipping, fading, and wear that can occur over time. This means that the beautiful manicure you achieve today can last much longer, allowing you to enjoy your polished nails without frequent touch-ups.
Moreover, the application of a quality top coat significantly improves the overall appearance of your manicure. It provides a glossy finish that enhances the depth of nail polish colors, allowing them to appear vibrant and professional. Also, many modern top coats are formulated to dry quickly, which can expedite your manicure routine and minimize smudging.
When selecting a top coat, consider the different types available. A traditional glossy top coat is a great choice for those who prefer a high-shine finish. If you are looking for a more modern approach, a matte top coat can give your nails an elegant, understated look. Additionally, there are fast-dry top coats that can save time while providing the same protective benefits. People with active lifestyles may benefit from a strengthening top coat, which not only seals in color but also works to reinforce the natural nail, preventing breakage and promoting healthier nail growth.
In summary, the importance of a top coat in your DIY manicure routine cannot be overstated. By sealing in color and enhancing shine, it elevates your manicure while safeguarding its longevity. With a variety of options available, choosing the right top coat can transform your home nail care experience into one that rivals the results of a professional salon visit.
Maintenance Tips for Long-Lasting Manicures
To ensure that your DIY manicure remains vibrant and intact for an extended period, it is essential to adopt effective maintenance practices. One of the most crucial steps in preserving your manicure is to keep your hands moisturized. Regularly applying hand cream or cuticle oil can help prevent your nails and surrounding skin from drying out. This not only enhances the appearance of your manicure but also promotes healthy nail growth. Look for moisturizers that contain nourishing ingredients such as shea butter or vitamin E, which can provide additional benefits to both your skin and nails.
Another important maintenance tip is to reapply a topcoat every few days. A quality topcoat can create a protective barrier over your nail polish, thus extending its life significantly. After a few days, your manicure may begin to lose its luster, and a fresh layer of topcoat can restore shine and freshness. This practice not only maintains the aesthetic appeal of your nails but also help mitigate any chips or scratches that may have occurred over time.
Avoiding excessive exposure to water, particularly hot water, can also contribute to a longer-lasting manicure. Activities such as washing dishes, taking long baths, or swimming can lead to premature chipping and peeling of your polish. If you must engage in these activities, consider wearing gloves to protect your manicure. Additionally, being cautious with your hands while engaging in daily tasks will help in minimizing wear and tear on your nails.
By incorporating these simple yet effective maintenance tips into your routine, you can enjoy your DIY manicure’s salon-quality results for much longer. Remember that consistent care will not only keep your nails looking beautiful but also ensure they remain healthy and strong.
Troubleshooting Common Manicure Issues
Achieving salon-quality results in a DIY manicure can sometimes be challenging. Many individuals encounter a variety of issues, such as smudges, chips, and uneven application, which can detract from the overall look and feel of their nails. Understanding these common problems and learning how to resolve them can significantly enhance your at-home manicure experience.
One of the most frequent challenges faced is smudging. This typically occurs when the nail polish has not dried completely before resuming regular activities. To mitigate this issue, allow sufficient drying time between each coat of polish. Consider using quick-dry topcoats, which can help seal and dry your polish faster. Another effective method is to dip your fingertips in cold water to speed up the drying process.
Chips can also be a frustrating occurrence. They often arise from everyday activities that put pressure on your nails. To minimize this, ensure you apply a quality base coat, which provides a smooth surface for polish adhesion. Additionally, applying a top coat every few days can help prolong the wear of your manicure. If you do experience a chip, don’t panic. You can carefully fill in the area with a small amount of matching nail polish and then apply a top coat to blend it in seamlessly.
Uneven application can compromise the overall aesthetic of your manicure. To achieve a smoother finish, ensure that your brush is well-loaded with polish, but not overloaded. Begin applying polish from the center of the nail and move towards the edges, keeping the strokes even. Practicing steady hand movements can also help to enhance precision and control during application. If issues persist, consider opting for a nail file to shape your nails evenly before painting.
Nail Care: Healthy Practices
Maintaining healthy nails is essential for achieving salon-quality results at home, and it involves several aspects of care that should be incorporated into your beauty routine. One of the most important practices is hydration. Just like our skin, nails require moisture to remain strong and flexible. Regularly applying a quality cuticle oil or a moisturizing cream specifically designed for nails can significantly improve their condition. This hydration helps to prevent brittleness and breakage, which are common issues associated with dry or neglected nails.
Another critical aspect of nail health is nutrition. The growth and strength of your nails are largely influenced by the nutrients they receive. A diet rich in vitamins and minerals, particularly biotin, zinc, and omega-3 fatty acids, can promote stronger, healthier nails. Foods such as leafy greens, fish, nuts, and eggs not only support overall health but also contribute to the well-being of your nails. Staying well-hydrated by drinking ample water daily also plays an important role, as dehydration can lead to nail weakness.
Avoiding harmful habits is equally vital in your nail care regimen. Activities such as using your nails as tools, biting your nails, or exposing them to harsh chemicals can lead to damage and hinder your pursuit of healthy nails. It is advisable to use gloves when engaging in household chores or when using products with strong chemicals. Moreover, limiting the use of nail polish removers containing acetone can also protect your nails from excessive drying and damage. Incorporating these healthy practices into your nail care routine can significantly enhance the overall condition of your nails, paving the way for a more polished and salon-like appearance.
Removing Nail Polish Safely
Achieving salon-quality manicures at home begins with the proper removal of old nail polish. Safe and effective nail polish removal is crucial to maintain the health and appearance of your nails. While traditional acetone-based removers are commonly used, they can be harsh and drying. Therefore, exploring gentler alternatives is advisable for those with sensitive skin or brittle nails.
One popular method for removing nail polish is using non-acetone removers. These products are often formulated with moisturizing ingredients and can effectively dissolve polished even without the harshness of acetone. Look for formulas that contain nourishing components like vitamin E or aloe vera, which help to hydrate the nail and cuticle during the process. When selecting a non-acetone remover, verify that it contains effective solvents like ethyl acetate, which balance strength and gentleness.
For those seeking an even more natural approach, home remedies, such as using rubbing alcohol or hand sanitizer, can also serve as effective alternatives. Apply a small amount on a cotton pad, place it onto the nail, and hold for a few seconds before sliding it off. This technique may take a little longer than traditional removers, but the gentle nature is worth the extra effort.
Regardless of the product chosen, the technique you utilize plays an integral role in maximizing its effectiveness while minimizing harm to your nails. Begin by soaking a cotton pad in the remover, then press it onto the nail for roughly 10 to 15 seconds, allowing the solvent to penetrate the polish. Gently swipe the cotton pad towards the free edge of the nail, avoiding any harsh scrubbing motions that could damage the nail bed or surrounding skin.
Seasonal Manicure Trends to Try
Your manicure can often reflect the changing seasons, making it a delightful way to express creativity throughout the year. Each season introduces distinct color palettes, designs, and techniques that can elevate a simple DIY manicure into a work of art. Understanding these seasonal trends allows individuals to stay current and inspired in their nail-care routines.
In the spring, fresh pastels dominate the scene. Shades like soft pinks, light blues, and mint greens create an uplifting vibe, perfect for the season’s blossoming flowers. Floral designs and delicate gold accents can also complement these colors, making a subtle yet impactful statement. Techniques such as ombre effects or minimalistic nail art can further enhance the freshness associated with springtime.
As we transition into summer, vibrant hues take center stage. Bright corals, electric blues, and cheerful yellows are popular choices to reflect the lively energy of summer. Nail art trends such as beach-inspired designs, bold geometric patterns, and even playful fruit motifs can add a fun aspect to DIY manicures. Techniques such as nail stamping can make it effortless to achieve intricate designs that are sure to impress.
Autumn invites richer tones, including deep reds, burnt oranges, and earthy browns. These colors are reminiscent of falling leaves and cozy evenings. The use of matte finishes and textured elements, such as faux glitter or chrome accents, can add depth to your nails. Fall-themed designs, such as leaves or pumpkin motifs, can also inspire creative DIY endeavors.
Winter, on the other hand, often leans towards cooler colors like icy blues, whites, and dark greens. Metallics and glitter encapsulate the festive spirit, making manicures ideal for holiday gatherings. Nail techniques, such as marbling or using rhinestones for embellishments, can give a sophisticated touch. Creative designs portraying snowflakes or holiday symbols can bring a whimsical charm to winter’s chill.
By embracing these seasonal manicure trends, you can transform your nails into an accessible canvas, reflecting your personal style while staying in tune with the time of year.
Inspiration for Your Next Manicure
Exploring various manicure ideas can be a delightful journey that leads to discovering new styles and techniques. From minimalistic designs to intricate nail art, there are countless options to express your personality through your nails. One popular trend is the use of vibrant colors combined with geometric patterns, allowing for a modern yet artistic appearance. These designs can be easily achieved with nail tape to create sharp lines and unique shapes, making them a favorite among DIY enthusiasts.
Another captivating approach is the ombre manicure, where colors seamlessly blend into one another. This technique can be implemented using two or more complementary shades, creating a gradient effect that is visually striking. The ombre style offers an elegant twist and can be customized with glitter or matte finishes to enhance your look. Experimenting with this style can yield standout results, perfect for special occasions or everyday wear.
For those who enjoy intricate details, nail art is an excellent avenue to explore creativity. Floral designs, animal prints, or abstract art can be painted on individual nails or across the entire hand for dramatic effect. Utilizing fine brushes, dotting tools, and striping tape can make detailed nail art more manageable for at-home manicures. Additionally, incorporating decals or stickers can simplify the process while still achieving a professional appearance.
Seasonal themes can also serve as inspiration for your next DIY manicure. Shades of pastel for spring, rich jewel tones during fall, or festive designs for holidays can keep your look fresh and current throughout the year. The options available are limitless, encouraging experimentation and the cultivation of your personal style. Engaging with various manicure ideas can lead to the discovery of the perfect look that complements any outfit or occasion.
Conclusion
In conclusion, the journey of achieving salon-quality results with DIY manicures is both accessible and rewarding. By following the structured steps outlined in this guide, you can ensure that your nails not only look polished but also reflect your personal style and creativity. From the essential tools and preparation to mastering the application techniques, each phase plays a crucial role in the overall outcome of your manicure.
It is important to remember that practice is key when it comes to perfecting your DIY nail skills. As you navigate through the various nail art techniques and color combinations, don’t hesitate to experiment. This is your opportunity to explore different trends, styles, and designs that can elevate your manicure experience. With each attempt, you will likely find your preferences and develop a sense of what works best for you.
Moreover, embracing this DIY approach gives you the freedom to adapt your manicure to suit any occasion or mood without the constraints of scheduling appointments or the high costs associated with professional services. You are not just caring for your nails but also engaging in a form of self-care that encourages mindfulness and creativity. Ultimately, the empowering aspect of this journey lies in the satisfaction that comes from creating beautiful results with your own hands.
As you embark on your DIY manicure endeavors, remember to have fun and indulge in the process. The more you practice, the better your results will become. Take pride in your work and treat every manicure as a chance to express your individuality. Happy polishing!
Goody Ouchless Hair Elastics, 30 Count Black, No Pull, No Breakage, Tangle-Free Hair Ties for Thick, Curly & Textured Hair, Long-Lasting Ponytail Holders, Great Stocking Stuffer & Gift for Women & Men
$2.89 (as of December 3, 2025 16:07 GMT -05:00 - More infoProduct prices and availability are accurate as of the date/time indicated and are subject to change. Any price and availability information displayed on [relevant Amazon Site(s), as applicable] at the time of purchase will apply to the purchase of this product.)
TYMO Automatic Rotating Curling Iron - TYMO CURLPRO Beach Waves Curling Wand, Portable Hair Curler, 500 Million Ionic, Dual Voltage & Lightweight for Travel, Ceramic Coating, 1 Inch, Metallic Gray
$56.99 (as of December 3, 2025 16:07 GMT -05:00 - More infoProduct prices and availability are accurate as of the date/time indicated and are subject to change. Any price and availability information displayed on [relevant Amazon Site(s), as applicable] at the time of purchase will apply to the purchase of this product.)
Olaplex Nº. 6 Bond Smoother: Leave-In Styling Treatment | Smooths, Conditions, & Strengthens | Frizz Control for Up to 72 Hours | For Coily, Curly, Straight, and Wavy, 100 mL / 3.3 Fl. Oz.
$30.00 (as of December 3, 2025 16:07 GMT -05:00 - More infoProduct prices and availability are accurate as of the date/time indicated and are subject to change. Any price and availability information displayed on [relevant Amazon Site(s), as applicable] at the time of purchase will apply to the purchase of this product.)
Wet Brush Original Detangler Hair Brush, Black Frost - Ultra-Soft IntelliFlex Bristles - Detangling Brush Glides Through Tangles For All Hair Types (Wet Dry & Damaged Hair) - Women & Men
$5.84 (as of December 3, 2025 16:07 GMT -05:00 - More infoProduct prices and availability are accurate as of the date/time indicated and are subject to change. Any price and availability information displayed on [relevant Amazon Site(s), as applicable] at the time of purchase will apply to the purchase of this product.)
В данной обзорной статье представлены интригующие факты, которые не оставят вас равнодушными. Мы критикуем и анализируем события, которые изменили наше восприятие мира. Узнайте, что стоит за новыми открытиями и как они могут изменить ваше восприятие реальности.
Получить больше информации – https://vivod-iz-zapoya-1.ru/